Spring Modulith 介绍
Spring Modulith 介绍
模块化单体架构是一种架构风格,我们的源代码是围绕模块的概念构建的。对于许多组织来说,模块化单体可能是一个极好的选择。它有助于保持一定程度的独立性,这有助于我们在需要时过渡到微服务架构。
Spring Modulith 是 Spring 的一个实验性项目,可用于构建模块化单体应用程序。它还支持开发人员构建结构良好、与领域对齐的 Spring Boot 应用程序。
在本教程中,我们将讨论 Spring Modulith 项目的基础,并展示如何在实践中使用它。
2. 模块化单体架构
我们有不同的方式来组织应用程序的代码。传统上,我们围绕基础设施设计软件解决方案。但是,当我们围绕业务设计应用程序时,可以更好地理解和维护系统。模块化单体架构就是这样一种设计。
模块化单体架构因其简单性和可维护性而在架构师和开发人员中越来越受欢迎。如果我们将领域驱动设计(DDD)应用于现有的单体应用程序,我们可以将其重构为模块化单体架构:
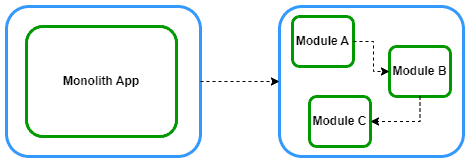
我们可以通过识别应用程序的领域并定义有界上下文来将单体的核心分割成模块。
让我们看看如何在 Spring Boot 框架内实现模块化单体应用程序。Spring Modulith 包括一套库,帮助开发人员构建模块化的 Spring Boot 应用程序。
3. Spring Modulith 基础
Spring Modulith 帮助开发人员使用由领域驱动的应用程序模块进行工作。同时,它还支持验证和记录这种模块化安排。
3.1. Maven 依赖项
让我们从将 spring-modulith-bom 依赖项作为物料清单(BOM)导入到 pom.xml 的 <dependencyManagement> 部分开始:
``<dependencyManagement>``
    `<dependencies>`
        ```<dependency>```
            ```<groupId>```org.springframework.experimental```</groupId>```
            ```<artifactId>```spring-modulith-bom```</artifactId>```
            `<version>`0.5.1`</version>`
            ``<scope>``import``</scope>``
            `<type>`pom`</type>`
        ```</dependency>```
    `</dependencies>`
`</dependencyManagement>`
我们还需要一些核心的 Spring Modulith 依赖项:
```<dependency>```
    ```<groupId>```org.springframework.experimental```</groupId>```
    ```<artifactId>```spring-modulith-api```</artifactId>```
```</dependency>```
```<dependency>```
    ```<groupId>```org.springframework.experimental```</groupId>```
    ```<artifactId>```spring-modulith-starter-test```</artifactId>```
    ``<scope>``test``</scope>``
```</dependency>```
3.2. 应用程序模块
Spring Modulith 的主要概念是应用程序模块。应用程序模块是暴露 API 给其他模块的功能单元。同时,它还有一些内部实现,不应该被其他模块访问。当我们设计应用程序时,我们考虑每个领域都有一个应用程序模块。
Spring Modulith 提供了不同的方式来表达模块。我们可以将应用程序的领域或业务模块视为应用程序主包的直接子包。换句话说,应用程序模块是一个与 Spring Boot 主类(用 @SpringBootApplication 注解)位于同一级别的包:
├───pom.xml
├───src
    ├───main
    │   ├───java
    │   │   └───main-package
    │   │       ├───module A
    │   │       ├───module B
    │   │       └───module C
    │   │           ├───sub-module C
    │   │       │ MainApplication.java
现在,让我们看看一个包括 product 和 notification 领域的简单应用程序。在这个示例中,我们从 product 模块调用一个服务,然后 product 模块再调用 notification 模块的服务。
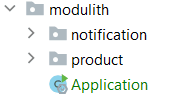
首先,我们将创建两个应用程序模块:product 和 notification。为此,我们需要在主包中创建两个直接子包:
让我们以 product 模块为例。我们在 product 模块中有一个简单的 Product 类:
public class Product {

    private String name;
    private String description;
    private int price;

    public Product(String name, String description, int price) {
        this.name = name;
        this.description = description;
        this.price = price;
    }

    // getters and setters

}
然后,让我们在 product 模块中定义 ProductService bean:
@Service
public class ProductService {

    private final NotificationService notificationService;

    public ProductService(NotificationService notificationService) {
        this.notificationService = notificationService;
    }

    public void create(Product product) {
        notificationService.createNotification(new Notification(new Date(), NotificationType.SMS, product.getName()));
    }

}
在这个类中,create() 方法调用了来自 notification 模块的公开 NotificationService API,并且还创建了 Notification 类的一个实例。
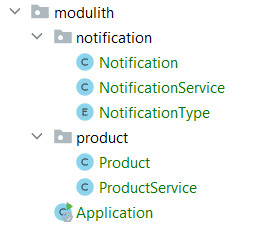
让我们看看 notification 模块。notification 模块包括 Notification、NotificationType 和 NotificationService 类。
让我们看看 NotificationService bean:
@Service
public class NotificationService {

    private static final Logger LOG = LoggerFactory.getLogger(NotificationService.class);

    public void createNotification(Notification notification) {
        LOG.info("Received notification by module dependency for product {} in date {} by {}.",
                notification.getProductName(),
                notification.getDate(),
                notification.getFormat());
    }

}
在这个服务中,我们只是记录了创建的产品。
最后,在 main() 方法中,我们从 product 模块调用 ProductService API 的 create() 方法:
@SpringBootApplication
public class Application {

    public static void main(String[] args) {
        SpringApplication.run(Application.class, args)
          .getBean(ProductService.class)
          .create(new Product("baeldung", "course", 10));
    }

}
目录结构如下所示:
3.3. 应用程序模块模型
我们可以根据安排从代码库中派生出应用程序模块模型。ApplicationModules 类提供了创建应用程序模块安排的功能。
让我们创建一个应用程序模块模型:
@Test
void createApplicationModuleModel() {
    ApplicationModules modules = ApplicationModules.of(Application.class);
    modules.forEach(System.out::println);
}
如果我们查看控制台输出,我们可以看到我们的应用程序模块安排:
# Notification
> Logical name: notification
> Base package: com.baeldung.ecommerce.notification
> Spring beans:
  + ….NotificationService

# Product
> Logical name: product
> Base package: com.baeldung.ecommerce.product
> Spring beans:
  + ….ProductService
正如我们所看到的,它检测到了我们的两个模块:notification 和 product。它还列出了每个模块的 Spring 组件。
3.4. 模块封装
值得注意的是,当前设计存在问题。ProductService API 可以访问 Notification 类,这是 notification 模块的内部功能。
在模块化设计中,我们必须保护和隐藏特定信息,并控制对内部实现的访问。Spring Modulith 使用应用程序模块基包的子包提供模块封装。
它还隐藏了类型,防止其他包中的代码引用。一个模块可以访问任何其他模块的内容,但不能访问其他模块的子包。
现在,让我们在每个模块内创建一个 internal 子包,并将内部实现移动到其中:
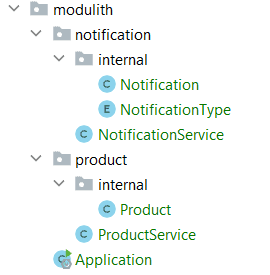
在这种安排中,notification 包被视为 API 包。其他应用程序模块的源代码可以引用该包中的类型。但是,来自 notification.internal 包的源代码不应被其他模块引用。
3.5. 验证模块结构
这种设计还有另一个问题。在上面的例子中,Notification 类位于 notification.internal 包中。但是,我们从其他包,比如 product 包,引用了 Notification 类:
public void create(Product product) {
    notificationService.createNotification(new Notification(new Date(), NotificationType.SMS, product.getName()));
}
不幸的是,这意味着它违反了模块访问规则。在这种情况下,Spring Modulith 不能使 Java 编译失败以防止这些非法引用。它使用单元测试来实现这一点:
@Test
void verifiesModularStructure() {
    ApplicationModules modules = ApplicationModules.of(Application.class);
    modules.verify();
}
我们使用 ApplicationModules 实例上的 verify() 方法来确定我们的代码安排是否符合预期的约束。Spring Modulith 使用 ArchUnit 项目提供此功能。
我们的验证测试因上面的例子而失败,并抛出了 _org.springframework.modulith.core.Violations_exception:
org.springframework.modulith.core.Violations:
- Module 'product' depends on non-exposed type com.baeldung.modulith.notification.internal.Notification within module 'notification'! Method
<com.baeldung.modulith.product.ProductService.create(com.baeldung.modulith.product.internal.Product)>calls constructor<com.baeldung.modulith.notification.internal.Notification.<init>(java.util.Date, com.baeldung.modulith.notification.internal.NotificationType, java.lang.String)> in (ProductService.java:25)
测试失败是因为 _product_ 模块试图访问 _notification_ 模块的内部类 _Notification_。

现在,让我们通过在 _notification_ 模块中添加一个 _NotificationDTO_ 类来修复它:

```java
public class NotificationDTO {
    private Date date;
    private String format;
    private String productName;

    // getters and setters
}
之后,我们在 product 模块中使用 NotificationDTO 实例,而不是 Notification:
public void create(Product product) {
    notificationService.createNotification(new NotificationDTO(new Date(), "SMS", product.getName()));
}
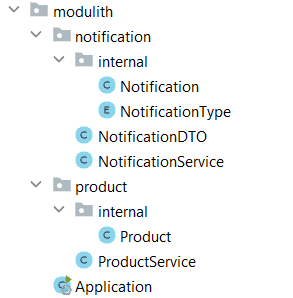
最终的目录结构如下所示:
3.6. 记录模块
我们可以记录项目中模块之间的关系。Spring Modulith 提供了基于 PlantUML 生成图表的功能,具有 UML 或 C4 外观。
让我们将应用程序模块导出为 C4 组件图表:
@Test
void createModuleDocumentation() {
    ApplicationModules modules = ApplicationModules.of(Application.class);
    new Documenter(modules)
      .writeDocumentation()
      .writeIndividualModulesAsPlantUml();
}
C4 图表将作为 puml 文件在 target/modulith-docs 目录中创建。
让我们使用在线 PlantUML 服务器呈现生成的组件图表:
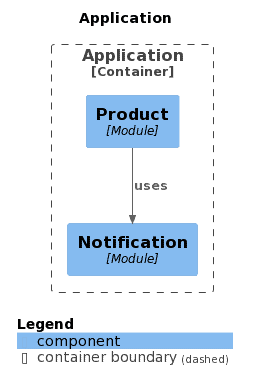
这个图表显示了 product 模块使用了 notification 模块的 API。
4. 使用事件进行模块间交互
我们有两种方法来进行模块间交互:依赖其他应用程序模块的 Spring bean 或使用事件。
在前一节中,我们将 notification 模块 API 注入到 product 模块中。然而,Spring Modulith 鼓励使用 Spring Framework 应用程序事件进行模块间通信。为了使应用程序模块尽可能地解耦,我们使用事件发布和消费作为主要的交互手段。
4.1. 事件发布
现在,让我们使用 Spring 的 ApplicationEventPublisher 来发布一个领域事件:
@Service
public class ProductService {

    private final ApplicationEventPublisher events;

    public ProductService(ApplicationEventPublisher events) {
        this.events = events;
    }

    public void create(Product product) {
        events.publishEvent(new NotificationDTO(new Date(), "SMS", product.getName()));
    }

}
我们简单地注入了 ApplicationEventPublisher 并使用了 publishEvent() API。
4.2. 应用程序模块监听器
要注册一个监听器,Spring Modulith 提供了 @ApplicationModuleListener 注解:
@Service
public class NotificationService {
    @ApplicationModuleListener
    public void notificationEvent(NotificationDTO event) {
        Notification notification = toEntity(event);
        LOG.info("Received notification by event for product {} in date {} by {}.",
                notification.getProductName(),
                notification.getDate(),
                notification.getFormat());
    }
我们可以在方法级别使用 @ApplicationModuleListener 注解。在上面的例子中,我们消费了 NotificationDTO 事件并记录了详细信息。
4.3. 异步事件处理
对于异步事件处理,我们需要在监听器上添加 @Async 注解:
@Async
@ApplicationModuleListener
public void notificationEvent(NotificationDTO event) {
    // ...
}
此外,异步行为需要在 Spring 上下文中通过 @EnableAsync 注解启用。它可以添加到主应用程序类中:
@EnableAsync
@SpringBootApplication
public class Application {

    public static void main(String[] args) {
        // ...
    }

}
5. 结论
在本指南中,我们专注于并涵盖了 Spring Modulith 项目的基础知识。我们首先讨论了什么是模块化单体设计。
接下来,我们讨论了应用程序模块。我们还详细涵盖了创建应用程序模块模型和验证其结构。
最后,我们解释了使用事件进行模块间交互。
如常,文章的完整源代码可在 GitHub 上获取。