Spring Data JPA 多租户支持
Spring Data JPA 多租户支持
多租户是指一个软件应用实例服务于多个租户或客户。它确保了租户之间所需的隔离程度,使得租户使用的数据和资源与其他租户分离。本教程将展示如何在Spring Boot应用程序中使用Spring Data JPA配置多租户,同时使用JWT为租户添加安全性。
2. 多租户模型
多租户系统主要有三种方法:
- 独立数据库
- 共享数据库和独立架构
- 共享数据库和共享架构
2.1. 独立数据库
在这种方法中,每个租户的数据保存在独立的数据库实例中,与其他租户隔离。这也被称为“每个租户一个数据库”: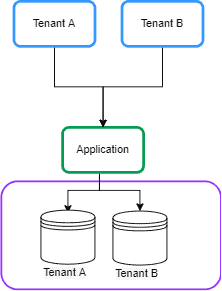
2.2. 共享数据库和独立架构
在这种方法中,每个租户的数据保存在共享数据库的不同架构中。有时这被称为“每个租户一个架构”: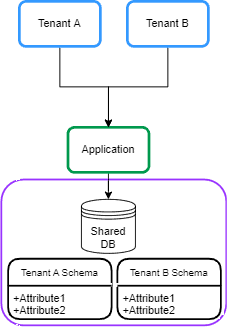
2.3. 共享数据库和共享架构
在这种方法中,所有租户共享一个数据库,每个表都有一个带有租户标识符的列: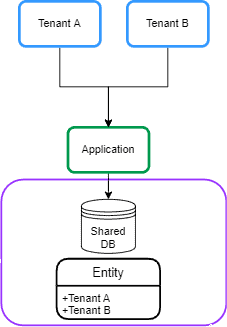
3. Maven依赖
让我们首先在Spring Boot应用程序的_pom.xml_中声明_spring-boot-starter-data-jpa_依赖:
````<dependency>````
    ````<groupId>````org.springframework.boot````</groupId>````
    ````<artifactId>````spring-boot-starter-data-jpa````</artifactId>````
````</dependency>````
我们还将在本教程中使用_PostgreSQL_数据库,因此让我们也在_pom.xml_文件中添加_postgresql_依赖:
````<dependency>````
    ````<groupId>````org.postgresql````</groupId>````
    ````<artifactId>````postgresql````</artifactId>````
    `<scope>`runtime`</scope>`
````</dependency>````
独立数据库和共享数据库以及独立架构的方法在Spring Boot应用程序的配置中是相似的。本教程我们专注于独立数据库方法。
4. 动态_DataSource_路由
在本节中,我们将描述“数据库每个租户”模型背后的一般思想。
4.1. AbstractRoutingDataSource
实现Spring Data JPA多租户的一般思想是基于当前租户标识符在运行时路由数据源。为了做到这一点,我们可以使用_AbstractRoutingDatasource_来动态确定当前租户的实际_DataSource_。让我们创建一个扩展_AbstractRoutingDataSource_类的_MultitenantDataSource_类:
public class MultitenantDataSource extends AbstractRoutingDataSource {

    @Override
    protected String determineCurrentLookupKey() {
        return TenantContext.getCurrentTenant();
    }
}
_AbstractRoutingDataSource_根据查找键将_getConnection_调用路由到不同的目标_DataSources_之一。查找键通常通过某些线程绑定的事务上下文来确定。因此,我们创建一个_TenantContext_类来存储每个请求中的当前租户:
public class TenantContext {

    private static final ThreadLocal``<String>`` CURRENT_TENANT = new ThreadLocal``<String>``();

    public static String getCurrentTenant() {
        return CURRENT_TENANT.get();
    }

    public static void setCurrentTenant(String tenant) {
        CURRENT_TENANT.set(tenant);
    }
}
我们使用_ThreadLocal_对象来保存当前请求的租户ID。此外,我们使用_set_方法存储租户ID,使用_get()_方法检索它。
4.2. 每个请求设置租户ID
在此配置设置之后,当我们执行任何租户操作时,我们需要在创建任何事务之前知道租户ID。因此,我们需要在控制器端点之前,在_Filter_或_Interceptor_中设置租户ID。让我们添加一个_TenantFilter_来在_TenantContext_中设置当前租户:
@Component
@Order(1)
class TenantFilter implements Filter {

    @Override
    public void doFilter(ServletRequest request, ServletResponse response,
      FilterChain chain) throws IOException, ServletException {

        HttpServletRequest req = (HttpServletRequest) request;
        String tenantName = req.getHeader("X-TenantID");
        TenantContext.setCurrentTenant(tenantName);

        try {
            chain.doFilter(request, response);
        } finally {
            TenantContext.setCurrentTenant("");
        }
    }
}
在这个过滤器中,我们从请求头_X-TenantID_中获取租户ID并将其设置在_TenantContext_中。我们沿着过滤器链传递控制权。我们的_finally_块确保在下一个请求之前重置当前租户。这避免了跨租户请求污染的任何风险。在下一节中,我们将在“每个租户数据库”模型中实现租户和数据源声明。
5. 数据库方法
在本节中,我们将基于“每个租户数据库”模型实现多租户。
5.1. 租户声明
在这种方法中,我们有多个数据库,所以我们需要在Spring Boot应用程序中声明多个数据源。我们可以在单独的租户文件中配置_DataSources_。因此,我们在_allTenants_目录中创建_tenant_1.properties_文件,并声明租户的数据源:
name=tenant_1
datasource.url=jdbc:postgresql://localhost:5432/tenant1
datasource.username=postgres
datasource.password=123456
datasource.driver-class-name=org.postgresql.Driver
此外,我们为另一个租户创建_tenant_2.properties_文件:
name=tenant_2
datasource.url=jdbc:postgresql://localhost:5432/tenant2
datasource.username=postgres
datasource.password=123456
datasource.driver-class-name=org.postgresql.Driver
我们将为每个租户最终得到一个文件: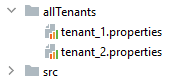
5.2. _DataSource_声明
现在我们需要使用_DataSourceBuilder_类读取租户的数据并创建_DataSource_。此外,我们需要在_AbstractRoutingDataSource_类中设置_DataSources_。让我们添加一个_MultitenantConfiguration_类来做这件事:
@Configuration
public class MultitenantConfiguration {

    @Value("${defaultTenant}")
    private String defaultTenant;

    @Bean
    @ConfigurationProperties(prefix = "tenants")
    public DataSource dataSource() {
        File[] files = Paths.get("allTenants").toFile().listFiles();
        Map``<Object, Object>`` resolvedDataSources = new HashMap``<Object, Object>``();

        for (File propertyFile : files) {
            Properties tenantProperties = new Properties();
            DataSourceBuilder dataSourceBuilder = DataSourceBuilder.create();

            try {
                tenantProperties.load(new FileInputStream(propertyFile));
                String tenantId = tenantProperties.getProperty("name");

                dataSourceBuilder.driverClassName(tenantProperties.getProperty("datasource.driver-class-name"));
                dataSourceBuilder.username(tenantProperties.getProperty("datasource.username"));
                dataSourceBuilder.password(tenantProperties.getProperty("datasource.password"));
                dataSourceBuilder.url(tenantProperties.getProperty("datasource.url"));
                resolvedDataSources.put(tenantId, dataSourceBuilder.build());
            } catch (IOException exp) {
                throw new RuntimeException("Problem in tenant datasource:" + exp);
            }
        }

        AbstractRoutingDataSource dataSource = new MultitenantDataSource();
        dataSource.setDefaultTargetDataSource(resolvedDataSources.get(defaultTenant));
        dataSource.setTargetDataSources(resolvedDataSources);

        dataSource.afterPropertiesSet();
        return dataSource;
    }

}
首先,我们从_allTenants_目录中读取租户的定义,并使用_DataSourceBuilder_类创建_DataSource_ bean。之后,我们需要为_MultitenantDataSource_类设置默认数据源和目标源,分别使用_setDefaultTargetDataSource_和_setTargetDataSources_。我们使用_application.properties_文件中的_defaultTenant_属性将一个租户的名称设置为默认数据源。为了完成数据源的初始化,我们调用_afterPropertiesSet()_方法。现在我们的设置已经准备好了。
6. 测试
6.1. 为租户创建数据库
首先,我们需要在_PostgreSQL_中定义两个数据库: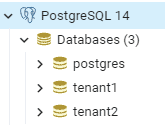 之后,我们使用以下脚本在每个数据库中创建一个_employee_表:
create table employee (id int8 generated by default as identity, name varchar(255), primary key (id));
6.2. 示例控制器
让我们创建一个_EmployeeController_类,用于在请求头中指定的租户中创建并保存_Employee_实体:
@RestController
@Transactional
public class EmployeeController {

    @Autowired
    private EmployeeRepository employeeRepository;

    @PostMapping(path = "/employee")
    public ResponseEntity`<?>` createEmployee() {
        Employee newEmployee = new Employee();
        newEmployee.setName("Baeldung");
        employeeRepository.save(newEmployee);
        return ResponseEntity.ok(newEmployee);
    }
}
6.3. 示例请求
让我们使用Postman创建一个在租户ID tenant_1 中插入_employee_实体的post请求: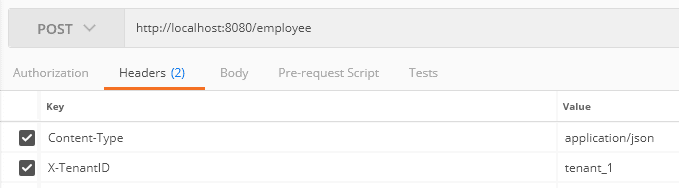 此外,我们向_tenant_2_发送请求:检查数据库后,我们发现每个请求都已保存在相关租户的数据库中。
7. 安全性
多租户应保护共享环境中客户的数据。这意味着每个租户只能访问他们的数据。因此,我们需要为租户添加安全性。让我们构建一个系统,用户必须登录应用程序并获取JWT,然后使用它来证明访问租户的权利。
7.1. Maven依赖
让我们首先在_pom.xml_中添加_spring-boot-starter-security_依赖:
````<dependency>````
    ````<groupId>````org.springframework.boot````</groupId>````
    ````<artifactId>````spring-boot-starter-security````</artifactId>````
````</dependency>````
此外,我们需要生成并验证JWT。为此,我们在_pom.xml_中添加_jjwt_:
````<dependency>````
    ````<groupId>````io.jsonwebtoken````</groupId>````
    ````<artifactId>````jjwt-api````</artifactId>````
    `<version>`0.12.3`</version>`
````</dependency>````
7.2. 安全配置
首先,我们需要为租户的用户提供认证能力。为了简单起见,我们在_SecurityConfiguration_类中使用内存中用户声明。从Spring Security 5.7.0-M2开始,类_WebSecurityConfigurerAdapter被弃用,并鼓励使用基于组件的安全配置。让我们创建一个带有UserDetails_的bean:
@Bean
public InMemoryUserDetailsManager userDetailsService() {
    UserDetails user1 = User
      .withUsername("user")
      .password(passwordEncoder().encode("baeldung"))
      .roles("tenant_1")
      .build();

    UserDetails user2 = User
      .withUsername("admin")
      .password(passwordEncoder().encode("baeldung"))
      .roles("tenant_2")
      .build();
    return new InMemoryUserDetailsManager(user1, user2);
}
我们为两个租户添加了两个用户。此外,我们将租户视为角色。根据上述代码,用户名_user_和_admin_分别可以访问_tenant_1_和_tenant_2_。现在,我们创建一个过滤器用于用户认证。让我们添加_LoginFilter_类:
public class LoginFilter extends AbstractAuthenticationProcessingFilter {

    public LoginFilter(String url, AuthenticationManager authManager) {
        super(new AntPathRequestMatcher(url));
        setAuthenticationManager(authManager);
    }

    @Override
    public Authentication attemptAuthentication(HttpServletRequest req, HttpServletResponse res)
      throws AuthenticationException, IOException, ServletException {

        AccountCredentials creds = new ObjectMapper().
          readValue(req.getInputStream(), AccountCredentials.class);

        return getAuthenticationManager().authenticate(
          new UsernamePasswordAuthenticationToken(creds.getUsername(),
            creds.getPassword(), Collections.emptyList())
        );
    }
}
_LoginFilter类扩展了_AbstractAuthenticationProcessingFilter。_AbstractAuthenticationProcessingFilter_拦截请求并尝试使用_attemptAuthentication()方法进行身份验证。在这个方法中,我们将用户凭据映射到_AccountCredentials DTO类,并使用内存认证管理器对用户进行身份验证:
public class AccountCredentials {

    private String username;
    private String password;

   // getter和setter方法
}
7.3. JWT
现在我们需要生成JWT并添加租户ID。为此,我们覆盖_successfulAuthentication()_方法。在成功认证后执行这个方法:
@Override
protected void successfulAuthentication(HttpServletRequest req, HttpServletResponse res,
  FilterChain chain, Authentication auth) throws IOException, ServletException {

    Collection`<? extends GrantedAuthority>` authorities = auth.getAuthorities();
    String tenant = "";
    for (GrantedAuthority gauth : authorities) {
        tenant = gauth.getAuthority();
    }

    AuthenticationService.addToken(res, auth.getName(), tenant.substring(5));
}
根据上述代码,我们获取用户的角色并将其添加到JWT中。为此,我们创建了_AuthenticationService_类和_addToken()_方法:
public class AuthenticationService {

    private static final long EXPIRATIONTIME = 864_000_00; // 1天的毫秒数
    private static final String SECRETKEY = "q3t6w9zCFJNcQfTjWnq3t6w9zCFJNcQfTjWnZr4u7xADGKaPd";
    private static final SecretKey SIGNINGKEY = Keys.hmacShaKeyFor(SECRETKEY.getBytes(StandardCharsets.UTF_8));
    private static final String PREFIX = "Bearer";

    public static void addToken(HttpServletResponse res, String username, String tenant) {
        String JwtToken = Jwts.builder()
          .subject(username)
          .audience().add(tenant).and()
          .issuedAt(new Date(System.currentTimeMillis()))
          .expiration(new Date(System.currentTimeMillis() + EXPIRATIONTIME))
          .signWith(SIGNINGKEY)
          .compact();
        res.addHeader("Authorization", PREFIX + " " + JwtToken);
    }
}
addToken_方法生成了包含租户ID作为_audience_声明的JWT,并将其添加到响应的_Authorization_头中。最后,我们在_SecurityConfiguration_类中添加LoginFilter。正如我们上面提到的关于WebSecurityConfigurerAdapter_的弃用。通过这种方式,我们将创建一个带有所有配置的bean:
@Bean
public SecurityFilterChain filterChain(HttpSecurity http) throws Exception {
    final AuthenticationManager authenticationManager = authenticationManager(http.getSharedObject(AuthenticationConfiguration.class));
    http
      .authorizeHttpRequests(authorize ->
        authorize.requestMatchers("/login").permitAll().anyRequest().authenticated())
      .sessionManagement(securityContext -> securityContext.sessionCreationPolicy(SessionCreationPolicy.STATELESS))
      .addFilterBefore(new LoginFilter("/login", authenticationManager), UsernamePasswordAuthenticationFilter.class)
      .addFilterBefore(new AuthenticationFilter(), UsernamePasswordAuthenticationFilter.class)
      .csrf(csrf -> csrf.disable())
      .headers(header -> header.frameOptions(HeadersConfigurer.FrameOptionsConfig::disable))
      .httpBasic(Customizer.withDefaults());

    return http.build();
}
此外,我们为在_SecurityContextHolder_类中设置_Authentication_添加_AuthenticationFilter_类:
public class AuthenticationFilter extends GenericFilterBean {

    @Override
    public void doFilter(ServletRequest req, ServletResponse res, FilterChain chain)
      throws IOException, ServletException {

        Authentication authentication = AuthenticationService.getAuthentication((HttpServletRequest) req);
        SecurityContextHolder.getContext().setAuthentication(authentication);

        chain.doFilter(req, res);
    }
}
7.4. 从JWT获取租户ID
让我们修改_TenantFilter_以在_TenantContext_中设置当前租户:
String tenant = AuthenticationService.getTenant((HttpServletRequest) req);
TenantContext.setCurrentTenant(tenant);
在这种情况下,我们使用_AuthenticationService_类的_getTenant()_方法从JWT中获取租户ID:
public static String getTenant(HttpServletRequest req) {
    String token = req.getHeader("Authorization");
    if (token == null) {
        return null;
    }
    String tenant = Jwts.parser()
      .setSigningKey(SIGNINGKEY)
      .build().parseClaimsJws(token.replace(PREFIX, "").trim())
      .getBody()
      .getAudience()
        .iterator()
        .next();
    return tenant;
}
8. 安全性测试
8.1. JWT生成
让我们为用户名_user_生成JWT。为此,我们将凭据发布到_/login_端点:让我们检查令牌:
eyJhbGciOiJIUzUxMiJ9.eyJzdWIiOiJ1c2VyIiwiYXVkIjoidGVuYW50XzEiLCJleHAiOjE2NTk2MDk1Njd9.
当我们解码令牌时,我们发现租户ID被设置为_audience_声明:
{
  "sub": "user",
  "aud": [
    "tenant_1"
  ],
  "iat": 1705473402,
  "exp": 1705559802
}
8.2. 示例请求
让我们使用生成的令牌创建一个插入_employee_实体的post请求:我们把生成的令牌设置在_Authorization_头中。租户ID已从令牌中提取并设置在_TenantContext_中。
9. 结论
在本文中,我们查看了不同的多租户模型。我们描述了在Spring Boot应用程序中添加多租户所需的类,使用Spring Data JPA针对独立数据库、共享数据库和独立架构模型。然后,我们为在PostgreSQL数据库中测试多租户设置了所需的环境