Nginx 作为正向代理的配置和使用教程
Nginx 作为正向代理的配置和使用教程
1. 引言
当谈到 Nginx,它是目前最受欢迎的服务器之一。它快速、轻量级,并且负责托管一些互联网上最大的网站。Nginx 通常被用作负载均衡器、反向代理和 HTTP 缓存等。
本教程将重点介绍如何将其用作请求位置的正向代理。
2. 使用正向代理的动机
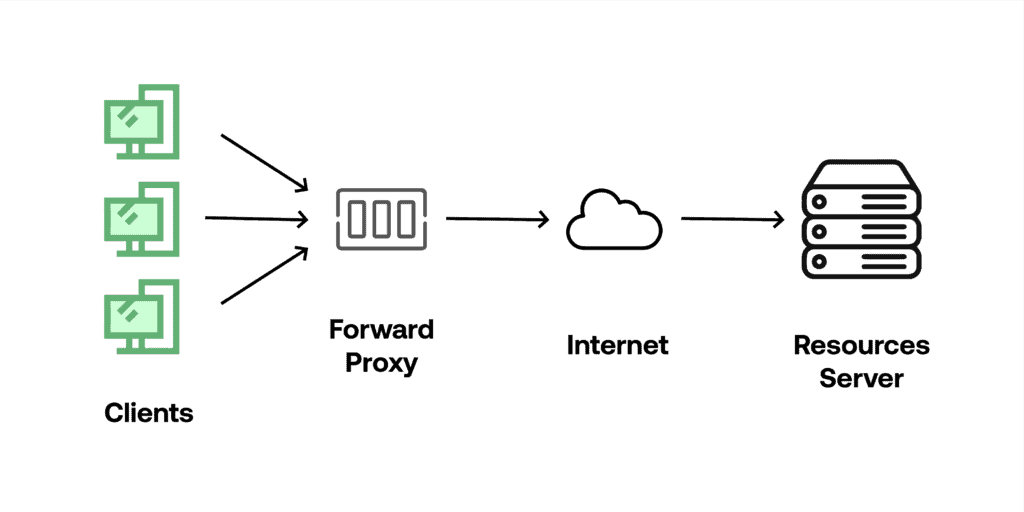
代理服务器是作为客户端和请求资源的主机之间的中间人实体。这意味着流量需要通过额外的机器才能到达目的地(主机服务器)。代理代表客户端继续请求,所以当主机服务器接受请求时,他们只能看到代理的 IP。相比之下,反向代理直接位于网络前面,将来自客户端的请求路由到正确的 Web 服务器(在多个服务器的网络中)。
使用正向代理的唯一缺点是它们在应用层工作,因此我们必须为每个计划路由流量的应用程序设置代理。
使用正向代理的一些用例包括:
- 隐藏 IP 和位置以获得访问位置限制的服务
- 对于需要连接互联网上特定资源的隔离内部网络
- 为了节省资源,对特定服务器的请求进行缓存,以获取很少变化的内容
值得注意的是,代理不加密流量,而 VPN 通过安全和加密的隧道重定向流量。
3. 使用 Nginx 实现正向代理
为了实现转发代理,我们将使用一台安装了 Nginx 的 Linux 机器。为了本教程的目的,我们将使用 VirtualBox 与一个正在运行的 Linux 发行版服务器以及安装的 Nginx,但您可以使用任何更方便的方法,如 Docker 或者角落里多年未用的旧 PC。
首先,我们找到默认的 Nginx 配置文件,并注释掉 server 部分以将其保存为归档副本。通常,我们可以在 /etc/nginx/sites-enabled/default 中找到它:
# 默认服务器配置
#server {
    #listen 80 default_server;
    #listen [::]:80 default_server;

    #root /var/www/html;

    #如果你使用 PHP,请将 index.php 添加到列表中
    #index index.html index.htm index.nginx-debian.html;

    #server_name _;

    #location / {
        #首先尝试作为文件提供请求,然后
        #作为目录,然后回退到显示 404。
        #try_files $uri $uri/ =404;
    #}
#}
接下来,让我们创建一个名为 forward 的新文件,并添加所有必要的配置,将 Nginx 变成一个工作的正向代理:
server {
    listen 8888;

    location / {
        resolver 8.8.8.8;

        proxy_pass http://$http_host$uri$is_args$args;
    }
}
使用第一个配置 ‘listen 8888;’ – 我们基本上是告诉服务器,所有发往这个端口的请求都必须用以下配置来处理。location 参数负责特定服务器子区域块配置,并基本上告诉服务器如何处理特定 URI 的请求。
‘resolver 8.8.8.8’ 指令指定了应该使用哪些名称服务器将上游服务器的名称解析为地址,在这种情况下 8.8.8.8 对应于 Google 的名称服务器。
变量 $http_host 包含原始请求中的主机,而 $uri 包含域或 IP 后的路径。最后两个变量 $is_args 和 $args 检查初始请求中的任何额外参数,并将它们自动添加到代理请求中。
在我们更新了所有必要的配置之后,我们需要重启 nginx.service 以使它们生效:
sudo systemctl restart nginx.service
正如我们之前提到的,正向代理在应用层工作,所以自然地,根据客户端的不同,我们有多种方式可以配置正向代理。在这一步中,我们将创建一个简单的 JavaScript 客户端并追踪请求。
在我们开始之前,让我们确保在我们的本地机器上安装了最新的 node.js 和 npm。接下来,我们创建客户端的目录和文件。让我们将目录命名为 Proxy Test,文件命名为 proxytest.js。
接下来,我们需要初始化 NPM 的 package.json,这样我们就可以安装所有需要的库。我们通过在项目目录中的终端运行 npm init 命令来完成这个操作:
npm init
在我们成功初始化存储库之后,我们需要安装我们将用于构建带有代理配置的自定义请求的请求库:
npm install request
最后,让我们打开一个 IDE 并将以下代码粘贴到我们的 proxytest.js 文件中:
var request = require('request');

request({
    'url':'http://www.google.com/',
    'method': "GET",
    'proxy':'http://192.168.100.40:8888'
},function (error, response, body) {
    if (!error && response.statusCode == 200) {
        console.log(body);
    }
})
现在,让我们运行这段代码片段:
node proxytest.js
让我们退一步,看看每一行。第一行将库导入到 request 对象中,我们将在后面使用它。
在 request 对象内,我们指定了目标服务器的 URL、HTTP 方法和代理作为 URL 和端口键对。在回调函数内,如果请求成功,我们在控制台中记录响应体。
接下来,让我们看看 Nginx 的调试日志:
2022/02/20 13:46:13 [debug] 1790#1790: *1 http script copy: "http://"
2022/02/20 13:46:13 [debug] 1790#1790: *1 http script var: "www.google.com"
2022/02/20 13:46:13 [debug] 1790#1790: *1 http script var: "/"
2022/02/20 13:46:13 [debug] 1790#1790: *1 http script var: ""
2022/02/20 13:46:13 [debug] 1790#1790: *1 http init upstream, client timer: 0
2022/02/20 13:46:13 [debug] 1790#1790: *1 epoll add event: fd:7 op:3 ev:80002005
2022/02/20 13:46:13 [debug] 1790#1790: *1 http script copy: "Host"
2022/02/20 13:46:13 [debug] 1790#1790: *1 http script var: "www.google.com"
2022/02/20 13:46:13 [debug] 1790#1790: *1 http script copy: "Connection"
2022/02/20 13:46:13 [debug] 1790#1790: *1 http script copy: "close"
2022/02/20 13:46:13 [debug] 1790#1790: *1 http script copy: ""
2022/02/20 13:46:13 [debug] 1790#1790: *1 http script copy: ""
2022/02/20 13:46:13 [debug] 1790#1790: *1 http proxy header:
"GET / HTTP/1.0
Host: www.google.com
Connection: close

"
2022/02/20 13:46:13 [debug] 1790#1790: *1 http cleanup add: 0000560CE3CF5E30
2022/02/20 13:46:13 [debug] 1790#1790: *1 http finalize request: -4, "/?" a:1, c:2
2022/02/20 13:46:13 [debug] 1790#1790: *1 http request count:2 blk:0
2022/02/20 13:46:13 [debug] 1790#1790: *1 http run request: "/?"
2022/02/20 13:46:13 [debug] 1790#1790: *1 http upstream check client, write event:1, "/"
2022/02/20 13:46:14 [debug] 1790#1790: *1 http upstream resolve: "/?"
2022/02/20 13:46:14 [debug] 1790#1790: *1 name was resolved to 142.250.184.100
2022/250.184.100
2022/02/20 13:46:14 [debug] 1790#1790: *1 name was resolved to 2a00:1450:4002:406::2004
2022/02/20 13:46:14 [debug] 1790#1790: *1 get rr peer, try: 2
2022/02/20 13:46:14 [debug] 1790#1790: *1 get rr peer, current: 0000560CE3CF5EB8 -1
2022/02/20 13:46:14 [debug] 1790#1790: *1 stream socket 12
2022/02/20 13:46:14 [debug] 1790#1790: *1 epoll add connection: fd:12 ev:80002005
2022/02/20 13:46:14 [debug] 1790#1790: *1 connect to 142.250.184.100:80, fd:12 #3
正如我们所看到的,我们的初始请求通过代理。代理服务器立即启动了一个新的请求,包含初始请求的所有数据,发送到目标资源。然后,它从资源中获取响应并将其返回给我们的客户端:
2022/02/20 13:46:14 [debug] 1790#1790: *1 http proxy status 200 "200 OK"
2022/02/20 13:46:14 [debug] 1790#1790: *1 http proxy header: "Date: Sun, 20 Feb 2022 12:46:15 GMT"
2022/02/20 13:46:14 [debug] 1790#1790: *1 http proxy header: "Expires: -1"
2022/02/20 13:46:14 [debug] 1790#1790: *1 http proxy header: "Cache-Control: private, max-age=0"
2022/02/20 13:46:14 [debug] 1790#1790: *1 http proxy header: "Content-Type: text/html; charset=ISO-8859-1"
2022/02/20 13:46:14 [debug] 1790#1790: *1 http proxy header: "P3P: CP=\"This is not a P3P policy! See g.co/p3phelp for more info.\""
2022/02/20 13:46:14 [debug] 1790#1790: *1 http proxy header: "Server: gws"
2022/02/20 13:46:14 [debug] 1790#1790: *1 http proxy header: "X-XSS-Protection: 0"
2022/02/20 13:46:14 [debug] 1790#1790: *1 http proxy header: "X-Frame-Options: SAMEORIGIN"
2022/02/20 13:46:14 [debug] 1790#1790: *1 http proxy header: "Set-Cookie: 1P_JAR=2022-02-20-12; expires=Tue, 22-Mar-2022 12:46:15 GMT; path=/; domain=.google.com; Secure"
2022/02/20 13:46:14 [debug] 1790#1790: *1 http proxy header: "Set-Cookie: NID=511=IkyJTmMt6I2b3fHpGNUwdfCkv1q9cjzyeUaxC-cxMZWcbmSi4sVlRlwXJUTRA9ujqQnK2v6DNyhitL3zPRSf7RSIHDCv8aYcUD7jp3vX4sE7ZkiprAWmJo9FlnUJtV9H0IzOFyPck15Jfs0zb1VeOMOjKZk0BZ0XRQ3gNptMOl8; expires=Mon, 22-Aug-2022 12:46:15 GMT; path=/; domain=.google.com; HttpOnly"
2022/02/20 13:46:14 [debug] 1790#1790: *1 http proxy header: "Accept-Ranges: none"
2022/02/20 13:46:14 [debug] 1790#1790: *1 http proxy header: "Vary: Accept-Encoding"
2022/02/20 13:46:14 [debug] 1790#1790: *1 http proxy header done
2022/02/20 13:46:14 [debug] 1790#1790: *1 xslt filter header
2022/02/20 13:46:14 [debug] 1790#1790: *1 HTTP/1.1 200 OK
Server: nginx/1.18.0
Date: Sun, 20 Feb 2022 12:46:14 GMT
Content-Type: text/html; charset=ISO-8859-1
Transfer-Encoding: chunked
Connection: close
Expires: -1
Cache-Control: private, max-age=0
P3P: CP=\"This is not a P3P policy! See g.co/p3phelp for more info.\"
X-XSS-Protection: 0
X-Frame-Options: SAMEORIGIN
Set-Cookie: 1P_JAR=2022-02-20-12; expires=Tue, 22-Mar-2022 12:46:15 GMT; path=/; domain=.google.com; Secure
Set-Cookie: NID=511=IkyJTmMt6I2b3fHpGNUwdfCkv1q9cjzyeUaxC-cxMZWcbmSi4sVlRlwXJUTRA9ujqQnK2v6DNyhitL3zPRSf7RSIHDCv8aYcUD7jp3vX4sE7ZkiprAWmJo9FlnUJtV9H0IzOFyPck15Jfs0zb1VeOMOjKZk0BZ0XRQ3gNptMOl8; expires=Mon, 22-Aug-2022 12:46:15 GMT; path=/; domain=.google.com; HttpOnly
Accept-Ranges: none
Vary: Accept-Encoding

2022/02/20 13:46:14 [debug] 1790#1790: *1 write new buf t:1 f:0 0000560CE3CF7AD0, pos 0000560CE3CF7AD0, size: 760 file: 0, size: 0
2022/02/20 13:46:14 [debug] 1790#1790: *1 http write filter: l:0 f:0 s:760
2022/02/20 13:46:14 [debug] 1790#1790: *1 http cacheable: 0
2022/02/20 13:46:14 [debug] 1790#1790: *1 http proxy filter init s:200 h:0 c:0 l:-1
2022/02/20 13:46:14 [debug] 1790#1790: *1 http upstream process upstream
当请求成功发送到目标时,我们在日志中看到响应“200 OK”,这意味着请求被接受并且响应成功返回。从我们的日志中我们还可以看到所有目标服务器返回的 HTTP 头,逐行列出。目标服务器返回的任何 HTTP 头都会自动添加到代理返回对象中。
5. 结论
在本教程中,我们学习了如何使用 Nginx 服务器设置一个简单且轻量级的正向代理。我们了解了正向代理和 VPN 之间的重要区别。最后,我们还学习了如何将基于 JavaScript 的客户端连接到我们新创建的正向代理。
完整的源代码可以在 GitHub 上找到。 OK