在Feign客户端中提供OAuth2令牌
在Feign客户端中提供OAuth2令牌
1. 概述
OpenFeign 是一个声明式的 REST 客户端,我们可以在 Spring Boot 应用程序中使用它。假设我们有一个使用 OAuth2 保护的 REST API,我们希望使用 OpenFeign 调用它。在这种情况下,我们需要为 OpenFeign 提供一个访问令牌。
在本教程中,我们将描述如何为 OpenFeign 客户端添加 OAuth2 支持。
2. 服务间认证
服务间认证是 API 安全性的热门话题。我们可以使用 mTLS 或 JWT 为 REST API 提供认证机制。然而,OAuth2 协议是保护 API 的事实上的解决方案。假设我们希望使用另一个服务(客户端角色)调用一个安全服务(服务器角色)。在这种情况下,我们使用客户端凭据授权类型。我们通常使用客户端凭据在没有最终用户的两个 API 或系统之间进行认证。下图显示了这种授权类型中的主要参与者:
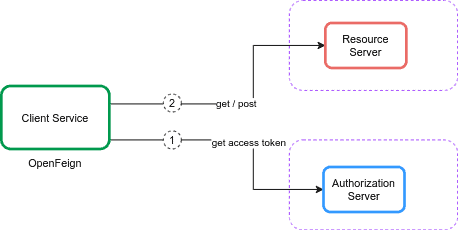
在客户端凭据中,客户端服务从授权服务器使用令牌端点获取访问令牌。然后它使用访问令牌访问由资源服务器保护的资源。资源服务器验证访问令牌,如果有效,则提供请求。
让我们为颁发访问令牌设置一个授权服务器。为了现在保持简单,我们将在 Spring Boot 应用程序中嵌入 Keycloak。假设我们使用在 GitHub 上可用的授权服务器项目。首先,我们在嵌入的 Keycloak 服务器的 master 领域中定义 payment-app 客户端:
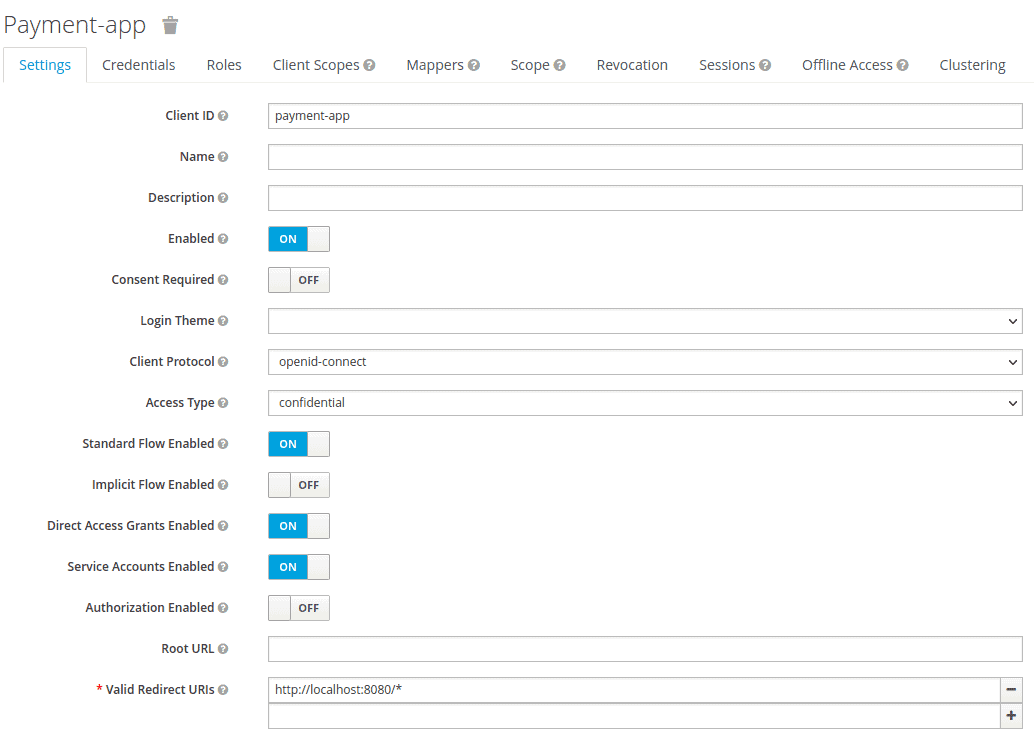
我们将 访问类型 设置为 凭据 并启用 启用服务帐户 选项。然后,我们将领域详细信息导出为 feign-realm.json 并在我们的 application-feign.yml 中设置领域文件:
keycloak:
  server:
    contextPath: /auth
    adminUser:
      username: bael-admin
      password: pass
    realmImportFile: feign-realm.json
现在,授权服务器已经准备好。最后,我们可以使用 –spring.profiles.active=feign 选项运行应用程序。由于我们本教程的重点是 OpenFeign OAuth2 支持,我们不需要深入了解它。
2.2. 资源服务器
现在我们已经配置了授权服务器,让我们设置资源服务器。 为此,我们将使用在 GitHub 上可用的资源服务器项目。首先,我们添加 Payment 类作为资源:
public class Payment {
    private String id;
    private double amount;

   // 标准 getter 和 setter
}
然后,我们在 PaymentController 类中声明一个 API:
@RestController
public class PaymentController {
    @GetMapping("/payments")
    public List``````<Payment>`````` getPayments() {
        List``````<Payment>`````` payments = new ArrayList<>();
        for(int i = 1; i `< 6; i++){
            Payment payment = new Payment();
            payment.setId(String.valueOf(i));
            payment.setAmount(2);
            payments.add(payment);
        }
        return payments;
    }
}
getPayments() API 返回一个支付列表。此外,我们在我们的 application-feign.yml 文件中配置资源服务器:
spring:
  security:
    oauth2:
      resourceserver:
        jwt:
          issuer-uri: http://localhost:8083/auth/realms/master
现在,getPayments() API 使用 OAuth2 授权服务器进行保护,我们必须提供一个有效的访问令牌来调用这个 API:
curl --location --request POST 'http://localhost:8083/auth/realms/master/protocol/openid-connect/token' \
  --header 'Content-Type: application/x-www-form-urlencoded' \
  --data-urlencode 'client_id=payment-app' \
  --data-urlencode 'client_secret=863e9de4-33d4-4471-b35e-f8d2434385bb' \
  --data-urlencode 'grant_type=client_credentials'
在获取访问令牌后,我们将其设置在请求的 Authorization 头中:
curl --location --request GET 'http://localhost:8081/resource-server-jwt/payments' \
  --header 'Authorization: Bearer Access_Token'
现在,我们希望使用 OpenFeign 而不是 cURL 或 Postman 调用安全 API。
3. OpenFeign 客户端
3.1. 依赖
为了使用 Spring Cloud OpenFeign 调用安全 API,我们需要将 spring-cloud-starter-openfeign 添加到我们的 pom.xml 文件中:
```<dependency>````
    ````<groupId>````org.springframework.cloud````</groupId>````
    ````<artifactId>````spring-cloud-starter-openfeign````</artifactId>````
    ````<version>````3.1.0````</version>````
````</dependency>````
此外,我们需要将 spring-cloud-dependencies 添加到 pom.xml:
```<dependency>```
    ````<groupId>````org.springframework.cloud````</groupId>````
    ````<artifactId>````spring-cloud-dependencies````</artifactId>````
    ````<version>````2021.0.0````</version>````
    `<type>`pom`</type>`
````</dependency>````
3.2. 配置
首先,我们需要在我们的主类中添加 @EnableFeignClients:
@SpringBootApplication
@EnableFeignClients
public class ExampleApplication {
    public static void main(String[] args) {
        SpringApplication.run(ExampleApplication.class, args);
    }
}
然后,我们定义 PaymentClient 接口以调用 getPayments() API。同时,我们需要在 PaymentClient 接口上添加 @FeignClient:
@FeignClient(
  name = "payment-client",
  url = "http://localhost:8081/resource-server-jwt",
  configuration = OAuthFeignConfig.class)
public interface PaymentClient {

    @RequestMapping(value = "/payments", method = RequestMethod.GET)
    List``````<Payment>`````` getPayments();
}
我们根据资源服务器的地址设置 url。在这种情况下,@FeignClient 的主要参数是支持 OAuth2 的 configuration 属性。之后,我们定义一个 PaymentController 类并将 PaymentClient 注入其中:
@RestController
public class PaymentController {
    private final PaymentClient paymentClient;

    public PaymentController(PaymentClient paymentClient) {
        this.paymentClient = paymentClient;
    }

    @GetMapping("/payments")
    public List``````<Payment>`````` getPayments() {
        List``````<Payment>`````` payments = paymentClient.getPayments();
        return payments;
    }
}
4. OAuth2 支持
4.1. 依赖
为了将 OAuth2 支持添加到 Spring Cloud OpenFeign,我们需要将 spring-security-oauth2-client 和 spring-boot-starter-security 添加到我们的 pom.xml 文件中:
```<dependency>```
    ````<groupId>````org.springframework.boot````</groupId>````
    ````<artifactId>````spring-boot-starter-security````</artifactId>````
    ````<version>````2.6.1````</version>````
````</dependency>````
```<dependency>```
    ````<groupId>````org.springframework.security````</groupId>````
    ````<artifactId>````spring-security-oauth2-client````</artifactId>````
    ````<version>````5.6.0````</version>````
````</dependency>````
4.2. 配置
现在,我们想要创建一个配置。想法是获取并添加一个访问令牌到 OpenFeign 请求中。 拦截器可以为每个 HTTP 请求/响应执行此任务。添加拦截器是 Feign 提供的一个有用功能。我们将使用一个 RequestInterceptor,它通过添加授权承载头将 OAuth2 访问令牌注入到 OpenFeign 客户端的请求中。让我们定义 OAuthFeignConfig 配置类并定义 requestInterceptor() bean:
@Configuration
public class OAuthFeignConfig {

    public static final String CLIENT_REGISTRATION_ID = "keycloak";

    private final OAuth2AuthorizedClientService oAuth2AuthorizedClientService;
    private final ClientRegistrationRepository clientRegistrationRepository;

    public OAuthFeignConfig(OAuth2AuthorizedClientService oAuth2AuthorizedClientService,
      ClientRegistrationRepository clientRegistrationRepository) {
        this.oAuth2AuthorizedClientService = oAuth2AuthorizedClientService;
        this.clientRegistrationRepository = clientRegistrationRepository;
    }

    @Bean
    public RequestInterceptor requestInterceptor() {
        ClientRegistration clientRegistration = clientRegistrationRepository.findByRegistrationId(CLIENT_REGISTRATION_ID);
        OAuthClientCredentialsFeignManager clientCredentialsFeignManager =
          new OAuthClientCredentialsFeignManager(authorizedClientManager(), clientRegistration);
        return requestTemplate -> {
            requestTemplate.header("Authorization", "Bearer " + clientCredentialsFeignManager.getAccessToken());
        };
    }
}
```在 _requestInterceptor()_ bean 中,我们使用 _ClientRegistration_ 和 _OAuthClientCredentialsFeignManager_ 类来注册 oauth2 客户端并从授权服务器获取访问令牌。为此,我们需要在我们的 _application.properties_ 文件中定义 _oauth2_ 客户端属性:

```properties
spring.security.oauth2.client.registration.keycloak.authorization-grant-type=client_credentials
spring.security.oauth2.client.registration.keycloak.client-id=payment-app
spring.security.oauth2.client.registration.keycloak.client-secret=863e9de4-33d4-4471-b35e-f8d2434385bb
spring.security.oauth2.client.provider.keycloak.token-uri=http://localhost:8083/auth/realms/master/protocol/openid-connect/token
让我们创建 OAuthClientCredentialsFeignManager 类并定义 getAccessToken() 方法:
public String getAccessToken() {
    try {
        OAuth2AuthorizeRequest oAuth2AuthorizeRequest = OAuth2AuthorizeRequest
          .withClientRegistrationId(clientRegistration.getRegistrationId())
          .principal(principal)
          .build();
        OAuth2AuthorizedClient client = manager.authorize(oAuth2AuthorizeRequest);
        if (isNull(client)) {
            throw new IllegalStateException("client credentials flow on " + clientRegistration.getRegistrationId() + " failed, client is null");
        }
        return client.getAccessToken().getTokenValue();
    } catch (Exception exp) {
        logger.error("client credentials error " + exp.getMessage());
    }
    return null;
}
我们使用 OAuth2AuthorizeRequest 和 OAuth2AuthorizedClient 类从授权服务器获取访问令牌。现在对于每个请求,OpenFeign 拦截器管理 oauth2 客户端并将访问令牌添加到请求中。
5. 测试
要测试 OpenFeign 客户端,让我们创建 PaymentClientUnitTest 类:
@RunWith(SpringRunner.class)
@SpringBootTest
public class PaymentClientUnitTest {

    @Autowired
    private PaymentClient paymentClient;

    @Test
    public void whenGetPayment_thenListPayments() {
        List``````<Payment>`````` payments = paymentClient.getPayments();
        assertFalse(payments.isEmpty());
    }
}
在这个测试中,我们调用 getPayments() API。底层的 PaymentClient 连接到 OAuth2 客户端并使用拦截器获取访问令牌。
6. 结论
在本文中,我们设置了调用安全 API 所需的环境。然后,我们通过一个实际的例子配置了 OpenFeign 来调用安全 API。为此,我们添加并配置了拦截器到 OpenFeign。拦截器管理 OAuth2 客户端并将访问令牌添加到请求中。
如常,本教程的完整源代码可在 GitHub 上获取。此外,资源和授权服务器的源代码也可在 GitHub 上获取。
OK